Quick fix
TERM=vt100Correct fix
wget https://raw.githubusercontent.com/thestinger/termite/master/termite.terminfo
tic -x termite.terminfoTERM=vt100wget https://raw.githubusercontent.com/thestinger/termite/master/termite.terminfo
tic -x termite.terminfoapt update && apt full-upgrade to update packages.dokku apps:create myapp.somedomain.com and add git remote add dokku dokku@DOKKU_HOSTNAME:myapp.somedomain.comdokku plugin:install https://github.com/dokku/dokku-postgres.git dokku postgres:create somedatabasenamedokku postgres:link somedatabasename myapp.somedomain.comDATABASE_URL from appdokku git:set --global deploy-branch productiondokku git:set myapp.somedomain.com deploy-branch stagingdokku config:set myapp.somedomain.com MY_ENV_VAR=valuedokku config:unset myapp.somedomain.com MY_ENV_VARdokku domains:report lists domains used per appdokku apps:list for a simple listdokku report myapp.somedomain.com to get some detailed outputdocker ps --all to see containers that have been runningdokku run myapp.subdomain.com 'whoami' runs shell commands in a containerConfigure with the LetsEncrypt plugin:
dokku plugin:install https://github.com/dokku/dokku-letsencrypt.gitdokku config:set --no-restart myapp.somedomain.com DOKKU_LETSENCRYPT_EMAIL=your@e.maildokku letsencrypt myapp.somedomain.com dokku letsencrypt:cron-job --add to set up auto-renewaldisplay: flex for the main containerjustify-content and align-items to centermax-width: 50vh.height: 100% and margin: 0. Can also use vh units.full-upgradeThese are all confusingly named, and could have been called sync, safe-update, force-update, and upgrade-os.
See also: man apt
Below are links I had open while learning how to use docker-compose with Rails, and using Dokku for deployments.
https://semaphoreci.com/community/tutorials/dockerizing-a-ruby-on-rails-application
https://thoughtbot.com/blog/rails-on-docker
https://www.linode.com/docs/applications/containers/docker-container-communication/
https://docs.docker.com/compose/rails/
https://gist.github.com/lucaspiller/d5bf6ea1c06b4dbaad98f97372319324
https://gitlab.com/guided-explorations/containers/kaniko-docker-build/-/blob/master/.gitlab-ci.yml
https://docs.gitlab.com/ee/ci/docker/using_kaniko.html
https://auth0.com/blog/hosting-applications-using-digitalocean-and-dokku/
http://dokku.viewdocs.io/dokku/getting-started/installation/
http://dokku.viewdocs.io/dokku/deployment/application-deployment/
http://dokku.viewdocs.io/dokku/getting-started/install/digitalocean/
https://blog.ssdnodes.com/blog/getting-started-docker-vps/
https://docs.docker.com/compose/production/
https://www.digitalocean.com/community/tutorials/how-to-install-and-use-docker-on-ubuntu-18-04

Many domain names come with free email forwarding, but sending so it appears to come from that domain name often requires a paid SMTP service that might cost £10/year. While searching I found Pobox that lets you set up multiple domains for a flat fee, which had the bonus of working via email forwarding that would let me keep my mail in Gmail.
But then I noticed that lots of email forwarding service were offering “Send mail using Gmail SMTP” for free! From ImprovMX, to ForwardEmail, all were using the same simple trick:
Gmail can be configured to send email to itself!
Set up a email forwarder on your domain name, to ensure that any emails get forwarded you your Gmail. Verify that this is working as it’ll be used by Google to verify you own the domain.
Consider using an alternative service if your domain registrar will aggressively block emails with attachments as spam.
Create an app password as if you were setting up a mail app on your phone or computer.
Set up 2FA first to get that option.


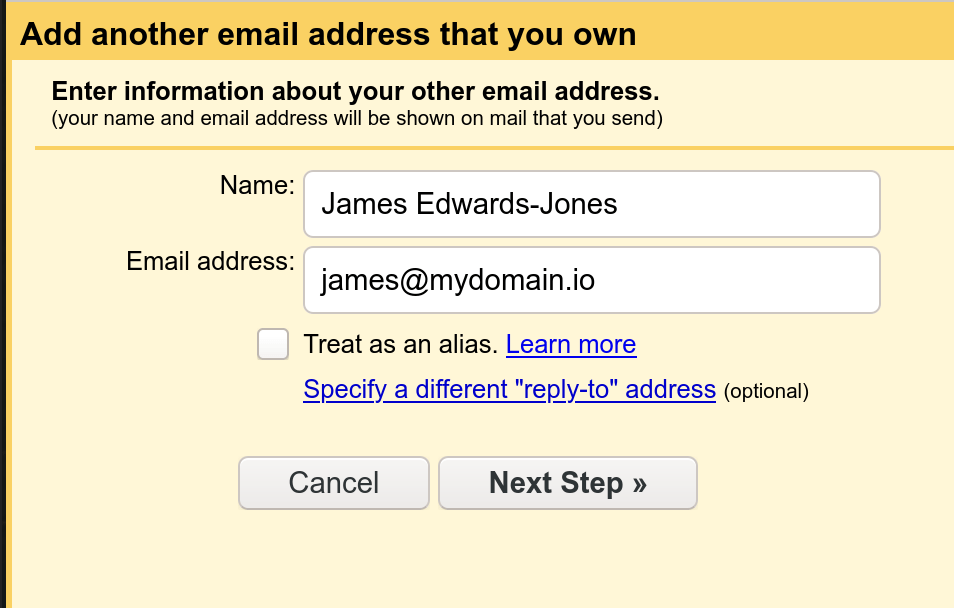
Add a new email address from your Gmail account settings. Set your chosen name@domain.name as the email address, and untick ‘treat as an alias’.
Configure Gmail to send with:
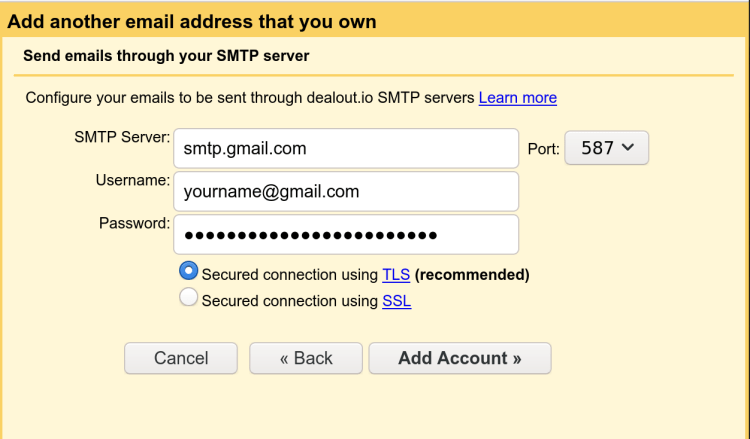
Confirm and you’re done!
With many linux systems moving from /etc/resolv.conf to systemd I was unsure how to set my DNS servers.
Add the following to /etc/systemd/resolved.conf:
DNS=1.1.1.1
FallbackDNS=8.8.8.8
Then restart with:
sudo systemctl restart systemd-resolvedYou can use systemd-resolve --status or sudo resolvectl status to see the current status and should see “DNS Servers” listed. Using systemd-resolve --status | grep 'Server' shows all DNS servers both global and local to a specific network, partly because more information is shown when piped, such as with systemd-resolve --status | cat. These might be
Following the comments in resolv.conf suggests man systemd-resolved where the inner workings are described in more detail, but man resolved.conf is was more helpful in working out what to set:
DNS=
A space-separated list of IPv4 and IPv6 addresses to use as system DNS servers.
FallbackDNS=
A space-separated list of IPv4 and IPv6
addresses to use as the fallback DNS servers
Domains=
A space-separated list of domains. These domains are used as search suffixes when resolving single-label host names (domain names which contain no dot), in order to qualify them into fully-qualified domain names (FQDNs).
I’m curious what Domains= does, so might investigate that later. Edit: These are search domains and are prepended if you lookup a domain/url without a dot in it. E.g. if I added Domains=jameslearnt.com, then I’d be able to enter today in my URL bar and have that take me to today.jameslearnt.com as a kind of online hosts file shortcut.
Using dig to check DNS records, such as with dig www.jameslearned.com -t cname, can be traced by appending +trace to the command.
Caches can be flushed with sudo systemd-resolve --flush-caches or sudo service dns-clean start.
For more detailed diagnostics it is possible to set sytemd-resolved into debug mode and trace the lookups, but I didn’t end up needing to do this.
Usually I set up sites on VPS services like DigitalOcean, but wanted to get better at producing quick minimum viable proof of concepts. This will mean I focus on creating value, in this case content, instead of having to spend time on one hundred and one other things.
In this instance I’ve chosen WordPress’s $48/year plan, as I’m used to the platform and willing to forego some of the niceties I’m used to like full control of the machine with SSH access, FTP to upload custom files, plugins and additional custom software.
I didn’t expect however that I’d be prevented from making minor adjustments to my site like changing the header colour, centring the site title, changing link colours or fixing spacing.
WordPress also prevent you from removing their “powered by WordPress” advert at the bottom of your site. Although I mind that less because it’s a generally good platform and I’d like to encourage other people to share things they learn, with WordPress remaining a great platform to start doing so.
Just don’t expect much control over how individual things look, or be ready to pay for their $300/year business plan to do so.
